This blog is about RC airplanes, drones, FPV and RC pilots.
If you like it, you can help me grow my blog and channel and improve my tools for making videos. Just use my affiliate program at Banggood,at no extra cost to you: ►https://goo.gl/fpFjTJ
These MODs anyone can do except roller replacement which requires some experience and knowledge in electronics.
►switch cap from Banggood: https://goo.gl/bBrXfb
►switch nut from eBay: https://goo.gl/DESt8K
►switch nut from Banggood: https://goo.gl/C1G4h4
►sticks from Banggood: https://goo.gl/Tq22xb
►sticks from eBay: https://goo.gl/jdJYKg
►roller from eBay: https://goo.gl/Mxqo9L
Spektrum radios, as many today's radios, have voice alerts which you can customise by your needs.
Switch based events
First type of voice events or alerts are switch based. It means that by changing position on any switch or even control sticks, you can have voice alert or event. That, for example, can be your Gear switch telling you about status of the gears or some other switch telling you in what flight mode you are, etc. It is very simple setup process that can be done in couple of minutes.
Time based events
Time based events are limited to telemetry data, so you need to have telemetry receiver and some sensors to create time based voice events. That can be very helpful, you can assign certain telemetry data to switch, and some other telemetry data to time based reports. Time based reports can be set up from 5 seconds up to 60 seconds. What that means ? It means that if you set your altitude data to 20 seconds, radio will alert you every 20 seconds with that data.
You can combine multiple time based voice events with switch based voice events.
Here is short video where you can see (and hear) all those types of custom voice events:
When I saw this plane on FliteTest page I have said to myself that I have to make one.
Awesome looking plane, just like some WWI fighters. And of course, I had to add something....
I am not an FPV guy, I prefer watching the plane while it flays.
Whole plane is made from white depron boards and it was finished quite fast, within 4 afternoons of easy work. Since I use white depron, I have multiple choices of painting this nice bird. This time I have used standard red covering film (non transparent) to cover the wings and almost whole fuselage.
Procedure on how to cover depron with standard covering film is explained in one of my previous articles.
As I have mentioned , I am not an FPV fan, and that space is great for adding a pilot. Which one should I choose ?
Friend of mine has borrowed me his 3D printer and decision was made. Snoopy. And of course, Snoopy needs a machine gun too. Vickers machine gun from WW1 suits him just fine.
Nose of the airplane was a bit ugly for me, so i had to cover it with something. Measured everything and drew radiator cover for the nose to print on 3D printer. Also, tail skid is 3D printed and there is no need for additional bamboo stick.
Dummy engines are 3D printed as well and hot glued on fuselage covering.
And final touch, Xenon LED strobes + red and green LED strip at wing tips (no photos of that, sorry).
Those strobes are excellent, highly visible during daylight, and I would recommend them for all types of flying vehicles. They are a little bit bigger than standard LEDs but if you have space put them on.
And finally, my setup (all links are from Banggood):
Well, everyone in RC hobby needs one.
This one has 4 outputs and if you use Digital servos, 2 digital modes of operation (and one analogue of course).
So no matter if you are testing servos or ESCs, this handy device will help you determine issues with your equipment .
This company publishes new products almost every 2 weeks, and I have received their new VTX which is loaded with new features.
Let's talk first about specifications. Mine came with RPSMA female antenna connector (there is a MMCX version too), standard 40 channels , 25mW/200mW/500mW/800mW power switchable and 7-24V input that provide 5V output for your camera.
Weights only 7 grams without antenna and cable, and small enough to put it on any type of vehicle
New feature is Smart Audio port which allows you to change channel band and frequency and even power output via your BetaFlight OSD controller (and radio of course). If you do not have that type of controller, you can change manually all parameters with button on the VTX. 7 segment LED display shows which band is in use , number of channel and power output mode.
Another feature is PitStop mode.
What is that ? Well, for FPV racers it is good thing, when you want to change channel frequency, you put it in pitStop mode. That mode transmits with very low power output (around 0.1mW), and if you accidentally enter channel that someone is using at that moment on the race track, he won't loose his picture because of that very low output. You will see your picture but on very short range due to low output (but probably you will see someone else's picture if you enter same frequency). Excellent feature for FPV racers.
First impressions and manual setup is explained in this video:
Time to test picture quality and range. Since this VTX doesn't come with antenna, I have used FatShark antenna for VTX and Eachine EV800D googles from Banggood with their original antennas. So nothing special, no special antennas, filters, or ground station. Everything stock on Eachine googles. These googles have DVR too and I have recorded whole flight with it. I can recommend these googles for excellent picture, DVR, built in battery and splittable designt that allows you to use it as a googles or as an LCD display mounted on your radio/tripod. LINK to Eachine googles.
And what did I get ? 4 kilometres of range without any problems using 800 mW output. That is awesome, more that I will ever need.
So if you need excellent and lightweight VTX for your FPV projects, with different output modes to suite regulations in various countries, I highly recommend this one from AKK.
This is ARF kit and demands some knowlege and a lot of patience.
So let's start.
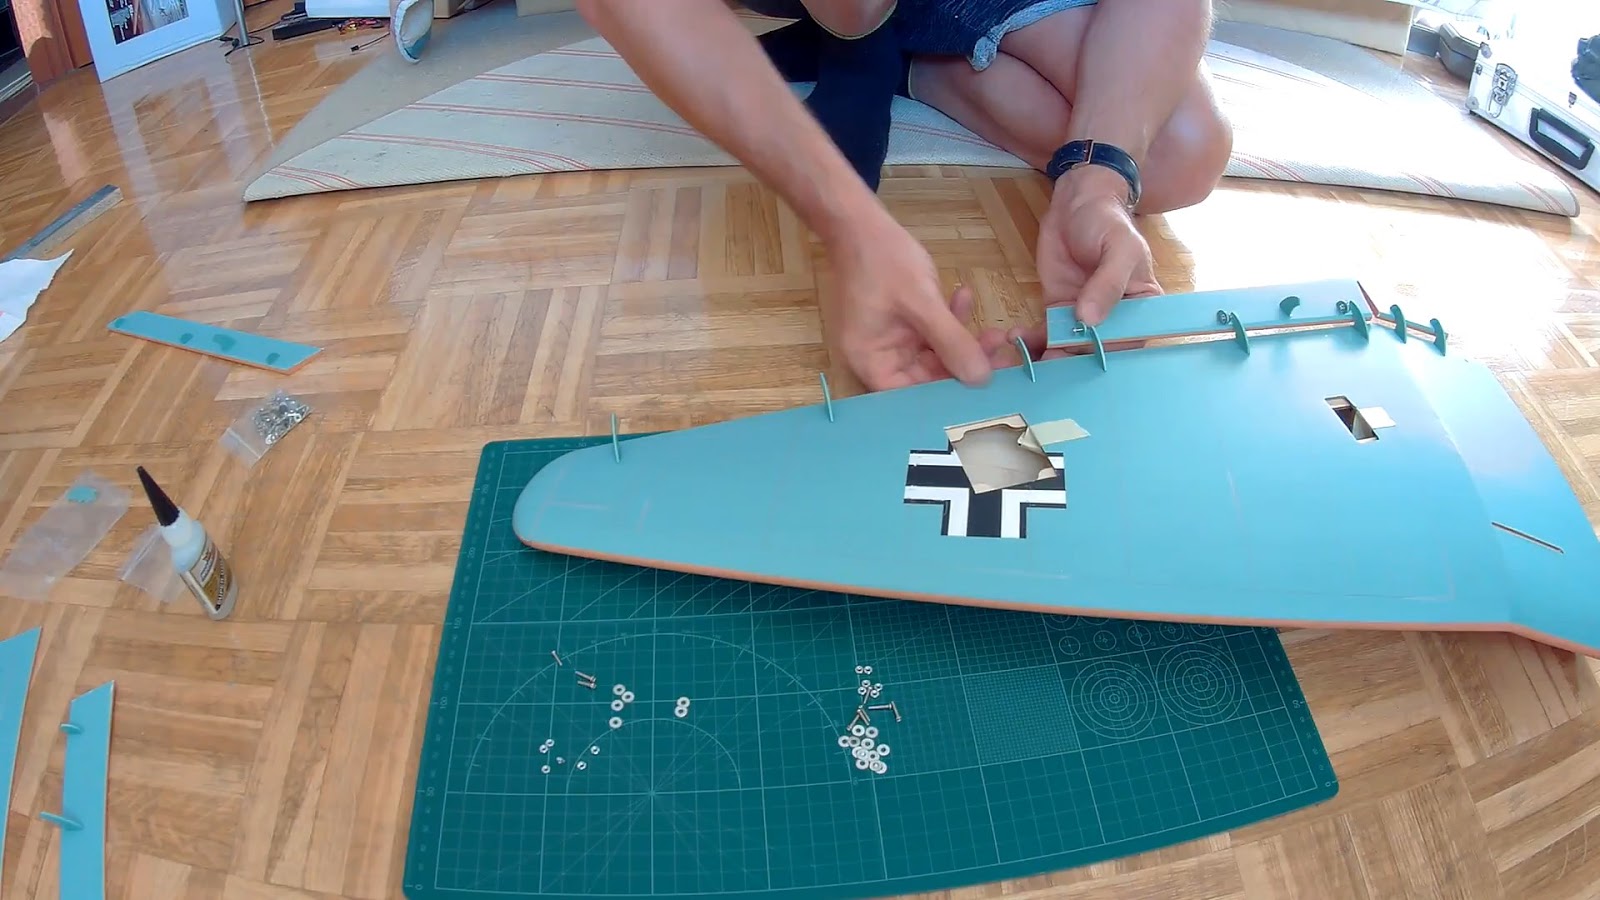
First is the wing, I would suggest you that you read manual very carefuly, count those hinges, they are different for flaps and ailerons. Also, be careful with static flaps, flaps and ailerons since there is left and right side ones.
Test fit everything before gluing.
Hinges are glued with CA glue. Each slot is cut for particular hinge type, but as said before, test fit hinges before gluing them.
Control surface hinges are all the same and you can't miss there.
When glue dries, mount control surfaces to hinges using M2 macnine screws provided. Use loctite on your bolts and don't tight too much those bolts, control surfaces need to move easily.
I would suggest that at this time you insert servo extension leads in both wings and fix them with some masking tape.
Mounting landing gears is easy, I used 5 min epoxy for wooden blocks that come into landing gear cowling (manual says use CA, it's up to you).
Prepare all the screws needed and mark position for them. Landing gear struts fit easy into the wing.
Again, manual says that you should use CA glue to close landing gear hatches, but this time I used just some piece of tape in case that I would need to open them.
If you haven't inserted servo extension leads before, do it now.
Glue main wing together with epoxy glue and let it dry.
Fuselage is much easier to assemble, just be careful to insert elevator control first, then horizontal stabiliser through fuselage slot.
I used 5 minute epoxy for gluing horizontal stabiliser.
Insert CA hinges and connect elevator control surface and glue it witg CA glue.
Rudder control is also easy one, first glue with CA tail wheel landing strut (check fit before doing that) and then using CA hinges glue the rudder to the vertical stabiliser and screw tail wheel bracket to the fuselage.
Horizontal stabiliser support is glued to the fuselage (you need to measure and cut the slot with hobby knife) and screwed to the stabiliser.
Slide the push rods for elevator and rudder and screw ball link clevis on them. Connect clevis to the control horns with M2 machine screws and secure with loctite.
Mount main wing on the fuselage with provided screws.
There is one last thing to do, bottom wing cover that is made of very fragile plastic. You need to cut that plastic with hobby knife at marked lines that are barely visible and glue it with CA to the wing.
Again, I didn't use CA but just standard transparent tape.
And that is it. Now you can install electronics of your choice.
My setup:
Motor: RCTimer BC3548-6 790KV Outrunner Brushless Motor
ESC: HobbyKing 60A ESC 4A UBEC
Servos: Corona DS329MG Digital Metal Gear Servo 3.8kg / 0.11sec / 32g
Propeller: 11x7 wooden propeller
Battery: 4S 4000 mAh LiPo
With this setup I have around 10 minutes of flight.
Maiden Flight
Nothing to say, everything is in the video
As with all AKK equipment received in past couple of months, this one comes well protected in the box.
What can you find in the box is the transmitter, standard stick antenna, connecting cables and short manual.
Transmitter itself has 2 buttons and 2 LED 7 segment displays which are really bright.
Weighting only 8.1 grams without antenna and cables it is suitable for any application like mini quad, RC airplane, flying wing etc.
Antenna connector is placed on the top of transmitter (there is a version with side antenna mount called K22) and it has standard 40 channels transmission divided into well known bands A,B,E,F and R.
Frequency chart is provided in the manual.
Changing band and frequency is really easy with provided 2 buttons on the side of the transmitter itself. One button changes band which is displayed on the first LED while second button changes frequency on that band and is displayed on the second LED display as a number from 1 to 8.
And that is it, select your preferred channel and you are good to go.
Transmitter also provides 5V output for your camera, so you don't need extra power supply for camera.
Working voltage of the transmitter is from 7V up to 20V, that means you can power it with LiPo battery from 2S up to 5S.
Power output is not stated anywhere, just range of up to 3000m. According to that data, I assume that it is 600mW transmitter.
I have connected AKK CA20 camera to the K33 transmitter and picture was excellent.
Also one important thing specially if you going to use this transmitter in the racing quad is latency.
Tested the latency and I couldn't see any delay in the picture (Check part 1 video).
For flight test I had to wait couple of days until weather cleared, but when sun came out I took it to the airfield and mounted to my old BB-J3 Cub RC airplane.
I have used stock stick antenna and had no issues during flight, picture was clear and with minimum or no interference at all.
Highly recommended.
Link to product: https://www.akktek.com/products/vtx/akk-k33.html?acc=43ec517d68b6edd3015b3edc9a11367b Specification:
Video Format: NTSC/PAL
Output Impedance: 50 Ohm
Transmitting distance: > 3000m (open area)
Antenna connector: RP-SMA connector
Operating Voltage: 7-20 V
Output Voltage(VOUT): 5 V
Supply current: 280 mA
Operating Temperature: -10 +85 ℃
Video Band Width: 0-8.0 MHz
Audio carrier Frequency: 6.5 MHz
Video Input Level: 0.8,1.0,1.2 Vp-p
Video Input Impedance: 75 Ohm
Audio Input Level: 0.5 ,2.0 Vp-p
Audio Input Impedance: 10K Ohm
There are a lot of similar products you can find in various Chinese shops, I had one that is not split system couple of months ago and was not happy with it.
This little thing really surprised me. Why ?
Well, let's start.
Most of AIO systems are in one piece. This is split system meaning that VTX is separated from the camera.
Though non split systems are good for micro quads, if you are planing to use FPV on micro airplanes like UMX series from Parkzone, that could be the problem.
Those micro airplanes are very light and adding AIO FPV on them will change the CoG of that airplane, so flying will be almost impossible.
That is where this split system comes. You can put a camera on the nose and move VTX little further away to have correct CG on the plane.
Or maybe you want your camera to be inside canopy and VTX outside.
Another problem with system that are all in one piece might be that you would like to add OSD.
OSD comes in between of camera video signal and transmitter, and since they are all in one piece, soldered together, you can't insert OSD in between.
This little thing comes as OSD ready, that means that if you want to install OSD on this FPV system, all you have to do is to cut yellow loop cable and connect your OSD.
Excellent solution.
And not to forget, this is 40 channel camera, you have a small button on VTX for changing channels and band, all instructions are in provided manual.
Now the picture quality.
For a such small device , image quality is excellent.
Since this is 25 mW transmitter as with all micro systems, range is (claimed by manufacturer) 150 meters. And here goes the big surprise
I got nice and clear picture up to 400 meters LOS with that little thingy and Eachine diversity googles.
That was big surprise for me, because my previous micro FPV system was loosing picture after 150-200 meters LOS.
Something about the battery.
You can use any 1S LiPo battery for this FPV system, it comes with adapter for standard 1S battery connectors, and default is E-Flite/Parkzone connector.
With 150 mAh 1S battery you can have around 8-10 minutes of video transmission.
This device really is low consumption.
Enough typing, I have recorded unboxing, hooking up and flight, so here it is:
I just got AKK CA20 camera and TS5823 VTX at a unbelievable price (camera is 20$ and VTX 10$).
My expectations for such low cost camera was not big, but this little thing surprised me with OSD and bunch of features (some of them I still do not understand well). With the camera you also receive a bunch of connecting cables and one with small controller for setting the camera features (a lot of them)-
Manual is really basic, and that is the only minus for this product. I would love to see better manual with explanation of all features that camera provides.
Lightweight camera (12.4 grams only) can operate from 5V up to 22V (so you can take power even from your receiver) and has an excellent picture and nice colors . It is 600 TVL NTSC standard and manufacturer claims that there is 1/3" SONY SUPER HAD II CCD,Nextchip 2040 DSP in it. According to quality of picture, it sure is. Link to product: https://www.akktek.com/products/cameras/akk-ca20.html?acc=43ec517d68b6edd3015b3edc9a11367b TS5828 VTX
This is 32 channel VTX (quite enough for my needs, but if that is not enough for you they have 40 CH versions) and 600 mW output comes with standard stick antenna and a bunch of connection cables. one of which is for connecting sports and action cameras (like Mobius). Only 7.1 grams and with operating voltage from 7V up to 24V it will suite all of your needs. VTX is suitable for video and audio transmission-
I have heard that people are using standard balsa covering film to cover foamies and I had to try it. And it really is very good solution. Gives the model some stiffness and if you use different colours, you don't have to paint it. I don't have modellers covering iron, but use standard iron that every house has. Just be sure to set it to synthetic, which is approximate temperature good for covering depron and balsa parts. But I suggest you to test first on some scrap piece of foam. Temperature too high will melt depron and foam and shrink covering film too much. Usually I cover only control surfaces with covering film, and sometimes whole airplane. Please support my blog by using these affiliate links:
Banggood: https://goo.gl/cn1B2P
Gearbest: https://goo.gl/D2pTdJ
or become a patron at https://www.patreon.com/RcFlyAddict
Easy setting up ailerons in three different ways with Spektrum radio explained. Each way depends on your airplane setup and each way has its own pluses and minuses.
If you get stuck, just ask in comments and I will respond as soon as I can.
Setting up a delta or elevon mixing on Spektrum radios are very easy. It can be confused where to use ELEVON or ELEVON-B mixing, and this video describes the case on how to setup Spektrum DX6 DX7 DX8 DX9 DX18 elevon mixing.
If you can't get proper control surface movement by ether of 2 elevon mixings, just switch servo connections on receiver and try this procedure again.
OrangeRx R1220XLR 12Ch 2.4GHz DSM2/DSMX Compatible Long Range Rx w/Sat, Div Ant, F/Safe & S.Bus and telemetry from HobbyKing flight review.
Finally flight test of new Orange receiver. I was skeptic because with V1 and V2 receivers I didn't have good telemetry range, but with this one everything works fine.
Now HobbyKing, make those Long Range receivers in 6 ch, 7 ch, 8 ch and 9 ch versions, please.
This is a third version of Orange receivers which support telemetry data. First version was very bad , I could get telemetry data only up to 15 meters from me while flying my airplane.
Soon they released V2 of telemetry receivers claiming that telemetry data range is up to 500 meters. Well, I bought that one too. Telemetry range was improved but not as claimed. I could get maximum of 80 to 100 meters of telemetry data.
I have to point out that receiving signal range for control of the aircraft never was an issue either in V1 or V2 telemetry receivers, only telemetry data range.
This one is, so called, Long Range receiver, with control range up to 3.5 kilometres and telemetry data range up to 1 kilometre, at least that is what specification says.
And here is Part 1 of review. Unfortunately, at this time there is only 12 channel receiver available , either with S.BUS or CPPM output. I hope that if this performs well, HobbyKing will make 6, 7, 8 and 9 channell versions.
As I have been for 8 years in this hobby, I have used couple of different servo manufacturers for my foam airplanes.
Since there are a lot of cheap Chinese servos on the market, I made this video to help you decide which one to buy.
You can always play on safe and buy Hitec HXT900 servo, but these TowerPro SG90 are much cheaper and have the same quality as Hitec ones.
The problem is that there are a lot of bad copies on eBay and you have to be careful when buying the original ones.
So, check my video and here is the link on eBay from which I have purchased my servos last time:
When I first saw video on FliteTest about building this airplane and that it doesn't have any "hard" wing spar e.g. carbon rod or wooden spar, I was a little skeptic.
Then, friend of mine made one, and when I saw how it flies, I was suprised .
The other thing that amazed me is using a hot glue. I never used hot glue before for building depron airplanes, I used mostly UhuPor and 5 minute epoxy.
So I have decided to make one and give it a try.
After printing PDF plans and transfering parts to depron board I realized that this one will be finished very quickly.
As I saw on FliteTest page that there are couple of variations for canopy, I have decided to make Ripslinger version.
You can't find cardboard in my county, so those parts are just plain paper with printed colour on InkJet printer and then covered with transparent self adhesive film.
Rest of the model is not painted, but covered with covering film (like balsa airplanes). That was my idea to use covering film on depron, and it showed to be good choice, it gives more stiffness to the wings and the fuselage.
Final product looks like this:
I can recommend this design to any RC pilot, beginner or experienced, it is excellent design and awesome flyer.It is quite stable on windy days, and can perform aerobatic maneuvers as well as it can be perfect trainer.
I am using 3S 2200 mAh Battery which gives me around 8-10 minutes of flight.
H-King Composite North American P-51D MUSTANG 1200mm (47")
Well, I just love warbirds, there are couple of them in my hangar, all of them are foam models.
When this nice airplane was announced , I just said to myself that I've got to have it.
To say the truth, it is not cheap plane, you need to purchase all electronics, ESC, servos, motor, propeller, battery and have your own radio and receiver. It comes with servoless retract gears which is nice surprise. But it surprised me how well built the model itself is.
Starting from the fuselage, which is made of composite material and painted extremely nice, with all possible details, over to wings and control surfaces. One minor issue is that on some spots on the wing you will need a little ironining, but that is no big deal.
Unboxing:
Assembly
Getting it ready for flight takes some time, at least 2-3 full afternoons of work if you want to do everything right. Installation of servos take time, because you have to prepare servo mounts and glue them, glue CA hinges (yes all control surfaces are hinged with CA hinges) and do a little drilling and adjusting. And there is additional work to do, install servoless retracts which came with the kit. This is a kit which requires some knowledge about building airplane models.
Servos used for wings are Corona 929MG, you can fin them on HobbyKing.
Fuselage
Since fuselage is in one piece, there is not much to do except install servos, glue horizontal stabilizer and hinge control surfaces, but it also takes a lot of time. Of course, like on the wings, after gluing everything together, you still need to mount control horns and use supplied push rods to connect it with servo arms.
Now, after that you can install motor on provided motor mount. I had to use all spacers provided plus added some washers to set correct distance for propeller.
Suggested NTM Prop Drive 3548 1100kv which I used is worst choice possible. I only did maiden flight with that motor, and replaced it immediately, very poor quality motor which produces a lot vibrations. Here is video about that poor motor:
Don't buy it, better solution is Turnigy D3548/4 1100KV which I use now and can also be found on HobbyKing. Used propeller for this setup with 60A ESC is 11x6 carbon prop. I am flying it with 2200mAh 3S battery around 4 minutes, and with 3300mAh 3S battery around 6-7 minutes.
Servos used in fuselage are HK15148B Digital Servo also available from HobbyKing. Last part is canopy, it takes some time to cut canopy on marked line, I didn't glue the canopy but used 4 self tapping screws to fix it to fuselage
Maiden flight
I was alone at the field for maiden flight so all I could record is from onboard cam and static cam on the ground. But after one week friend of mine helped me with second flight, so I will put that video instead of maiden.
And what to say about this model ? It is sports scale model , so prepare that it is quite fast, not like foam models, but extremely stable and acrobatic. Build quality is excellent and I can suggest it to all warbird lovers.
If you like my videos, please like, share and subscribe, that will give me best motivation to do this kind of videos more.
Well, they announce this series as high quality brushless motors, and I had a couple of different types from NTM series with same issues.
This motor is very bad, don't buy it!!
I have used it for my H-King Composite North American P-51D MUSTANG 1200mm (47") and only did maiden flight with it. It has a lot of vibrations, and when I disassembled the motor I could see why.
Bearings are unmatched with the shaft and there is too much of free space between shaft and bearing itself.
Replaced it with TurnigyD3548/4 1100KV motor which performs excellent.
I noticed that other customers had similar issues with these motor series so my suggestion is to avoid them.
Well, there is not much to say about this, I was waiting for weather to calm down a little.
Finally, sun came out and I have prepared to record maiden flight.
It was a windy day, but this model can manage that.
I had great help from friend of mine who flies mini quad racers, and he recorded great video by chasing me in the air.
Scratch build RC airplane tutorial - Part 3 - Paint
I thought that Part 3 will be maiden flight, but weather in Croatia didn't allow me to go at the field and make one.
So I have decided to do a simple paint job on this model.
Maiden flight will come very soon since it is recorded yesterday , and I need some time to put it all together.
First, let's do the canopy. Cut canopy from template and transfer it to any type of self adhesive covering you gave. I had blue one that fits just nice. Make sure that you cut mirrored canopy for the right side the other side
Let's continue by marking parts that will be painted with masking tape.
I have decided that I will paint only leading edges of the wing, wingtips and vertical stabilizer tip.
The best result you can achieve is by using paint roller.
Paint used is water based red paint. You can use any water based paint for making your airplane look nice.
You will need 2 layers of paint. Since this is water based paint, it dries pretty quick. Second layer can be applied after 30 minutes.
30 minutes after putting second layer of paint, remove the masking tape and your model is ready to dominate the sky.
Please support my blog by using these affiliate links:
First, sand the control surface edges to 45 degrees, both ailerons and elevators.
If you don't like sanding, you can do that with sharp hobby knife.
Do the same 45 degree bevel on wing where control surfaces hinge. Sand the leading edge of the wing to round.
Now, you need to make a groove in the wing for wing spar.
Grove can be made with dremmel rotary tool or just by cutting the V shaped groove with your hobby knife.
For wing spar best to use is carbon tube 4-5 mm diameter. If you can't find that, you can also use balsa square rod, or purchase plastic arrow at hunting and fishing shop and cut to size.
Mix some 5 minute epoxy glue and fill the groove with it.
And finally put the spar in the groove.
Be sure that wing is on flat surface, use some wax paper to cover it and put flat weight on the wing. I use books, but you can use anything you like.
Finally, when glue cures after 30 minutes, add transparent packing tape over wing spar.
Time to hinge control surfaces. I use tape hinges because they are cheapest solution, and hold very well. Be sure to put tape on both sides of control surfaces. In the next picture you can see how it should be done, and second picture shows final result on elevators.
Continue on assembling main fuselage. first glue those 2 longer doublers to fuselage intake sides and then glue in the fuselage sides itself.
You can use UhuPor glue or hot glue.
Prepare the hatch, glue hatch doublers from inside, but be careful not to put glue on part where hatch closes.
Continue with rest of the fuselage parts. Don't glue the bottom fuselage with hatch yet. We will need to install electronics before that. before closing
I have prepared motor mount from 3mm plywood. Mark motor holes and drill 1mm holes. Add a drop of CA on those holes. I use self tapering screws to fix the motor to motor mount.
Next is fixing the motor to the motor mount and gluing it to the fuselage with 5 min epoxy glue.
I use some scrap balsa pieces to reinforce the motor mount with fuselage.
While glue cures, prepare the servos. Be sure to center servos first and then mount servo horns.
After that, mark openings in fuselage for servos, cut them out and glue them in with hot glue.
Most boring part is (for me) connecting control surfaces to servos.
Use carbon rods, steel rods, anything you have, I use rods from old umbrella. Make Z-bends with pliers for servos, and use stoppers on horns for ailerons and elevator. This will take a lot of time, and final result is shown on following pictures.
After you finish that up, power on the servos and your radio, and center all control surfaces.
Now it's time to put that last fuselage piece with hatch on and glue it.
Only thing left is vertical stabilizer. on this model it's rather big, so I use 2 techniques for gluing it. First, I glue it with UhuPor, and second, I put some hot glue to it's sides as seen on the picture.
Finally, add packing tape to the leading edges of the wing and those wing tips, since they have tendency to break during landings in grass.
Final part is to glue U shaped intake at the front of the fuselage.
You can then sand all what you think still needs sanding, and you are ready to fly.
Full video of building this model is available here: